Showing posts with label food. Show all posts

Monday, 14 February 2011

Lots of love and a personal challenge for 2011

MrB and I don't celebrate St Valentine's Day in any formal, traditional way. (Several years ago I told MrB that if he were to send me flowers at my office that year he'd then be off the hook for the rest of our Valentine's Days together. He sent gorgeous balloons instead, one even being a giant frog, and he was very definitely off the hook.) Instead we celebrate the anniversary of a special day in our shared history on the 13th of February each year and treat the 14th as any other day of the year, specifically trying to avoid the commercialism that surrounds it 'nowadays.

Today, though, I thought I'd share a recipe I created last month and hey! I made it heart-shaped!

Happy Valentine's Day!

Almond Cookie-Press Cookies

1 cup dairy-free margarine at room temperature (plus some for buttering baking trays)
1/2 cup vegan cream cheese
1 cup granulated/castor sugar
3 cups plain flour
1/4 teaspoon salt
1/2 teaspoon vanilla extract
1 1/2 teaspoons almond extract
1/4 teaspoon baking powder

Fully combine margarine and cream cheese in a medium bowl. Add sugar and cream together.

Add salt, baking powder, vanilla and almond and blend well.

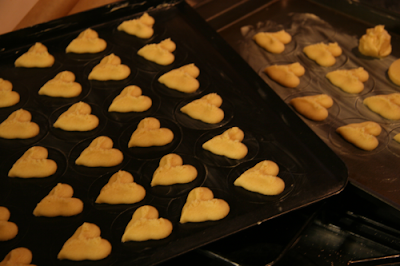
"Butter" (read: coat with a thin layer of dairy-free margarine) several baking trays (this recipe makes a LOT of cookies and I forgot to count how many but I'd comfortably guess it's more than 40!) before you start pressing your cookies. I was making cookie-press cookies based on recipes/videos I'd found online and when they recommended buttering your trays before you start; I though I'd be fine to just use baking paper. Boy, was that a silly move! The cookies won't stick to the baking paper which means they won't pull away from the cookie-press which means you're pressing cookies for no good reason. Please, people, learn from my mistakes! *grin*

Using a flexible spatula, fill cookie-press with dough and choose your shape disc. I chose the disc for making heart shapes (largely because I couldn't figure out which discs made which shapes) and away I went. My cookie-press has two cookie-thickness settings so I chose to use the thinner cookie setting and I pressed once for each cookie as I wanted them to be little morsels rather than "cookies", if that makes sense.


I then baked the cookies at 200C/350F for about 8 minutes. Too much longer and they started to colour. I wanted them to just be set with a hint of goldenness.

Allow to cool on baking tray for at least 10 minutes, remove to rack to cool completely.


I can't wait to use my cookie-press again! This time I might have to use each shape disc just to see what each produces!

~~~~~~~~~~~~~~~~~~~~~~~~~~~~~~~~~~~~~~~~~~~~~~~~~~

I'm on a self-induced (though inspired by futuregirl's*) craft diet this year.... A Challenge, if you will, to use what I have rather than buying more and more and making less and less.

What follows are photographic evidence of why I need to make this commitment to myself, to my bank balance, to the world (- why am I such a consumer?!) but please don't judge me too harshly... I do need to organise the whole set-up (that's on my list and it starts with filing about 45 years worth of paperwork) - and get a desk chair - but I know I've got at least a year's worth of crafting in there!


Want to know the worst part?.... That's not even any of my yarn in there! There's more *gasp* in other rooms in the house (living room, closet in the bedroom, etc)!

So, I've got a list longer than I am tall of things I want to make this year with the supplies I have so I now just need to get the motivation to actually do something other than brainstorming and dreaming and coveting!

Did you know that this is the first year in three years that I haven't been to my favourite two yarn stores in London to splurge on the Rowan Yarns sales? One of these retailers reported a drop in January sales as compared to the previous two years. *sigh* I know it's not all down to me but it brings home just how much I'd been spending on craft items and not getting many, if any, craft Finished Objects out of those items.

Have you set yourself a personal challenge for 2011?


*If you get the chance, peruse futuregirl's blog a bit... She's a Crochet Badass and totally inspirational for all "makers" out there.

Thursday, 30 December 2010

Something's not quite right...

I often pretend I know what I'm doing in the kitchen and this is most evident when I attempt to fancily decorate a cookie, cake or cupcake.

This is never more frustrating than when the tools I have don't work the way I believe they should.

Case in point:

In early May of this year I purchased a "Master Tip Set" and was very excited to get started on some super-cool and savvy decorating. It was a 57-piece set that came in it's own storage case.

I was quite disappointed to discover, however, that it didn't work the way I had wanted/expected. Some of my tips didn't fit on the "standard" couplers that came with the set. The tips were simply too large. Boo! *insert Sad face here*

I searched all over the company's website and couldn't find much information about the set that pertained to the particular problem I was having. I then discovered that there was, indeed, another size coupler. A "large" coupler. OK, at this point I'm annoyed that I have to buy another piece to make full use of the parts of a set. In my opinion, that set should have been ready to rock and roll when I bought it (i.e. all parts work with all parts) but I can see, from a sales point of view, how it's good business sense to "encourage" the purchase of other parts or pieces.

Begrudgingly, I decided to purchase a Large coupler. I would not, however, pay UK prices for one when MrB and I were scheduled to make a visit to the US that summer (where this brand's products are almost infinitely less expensive). I did, indeed, find and purchase what I needed.

I came home excited about many things but, in part, about being able to use some different tips from my set. Yes, I am a geek. I have accepted it, it's time you do, too.

I discovered, however, that this new addition to my arsenal wasn't the Be All and End All of my icing/piping problems. Yes, there were some tips that had been too large for my Standard Coupler that now worked/fit using the Large Coupler so I was on my way to Happy Decorating Land. The road had a few more sinkholes, however, and I didn't quite make it there. There were a few of my tips that didn't fit either coupler! Seriously?! *insert Very Angry face here*

I decided it was time to send the company an email...

Dear ****** Customer Service,
I'm a beginner at cake/cupcake decorating and I have a question.
I own the ****** Master Tip Set and it comes with two standard couplers for the "smaller" of the tips. Some of the tips in the set, however, are too large for the standard coupler so I purchased the "Large Tip Coupler". This coupler is too large for the larger tips. I'm at a loss. I can't see where you have a different size coupler but some of my tips, the 124 for example, just don't seem to work with either coupler.

Can you please tell me what I'm doing wrong/failing to understand?

Many thanks and kind regards,
Tanya
Mrs B bakes
And got this reply:
Dear Mrs. B Bakes,

I apologize for this inconvenience. All of our tips should fit on either the small coupler or larger coupler. Sometimes with use, they may bend and not be able to fit. I am sorry for the confusion. Please let me know if you have further questions.

Thanks,

Stephanie F
****** Brands Customer Care
Hrm. I've barely used my tips and I'm certain that they haven't been bent because I am quite the perfectionist when it comes to things I value and I always treat the parts of that set with utmost care.

So, I inspected them, just to be sure. Of course, there was no bending, no warping yet there were several tips that definitely didn't fit "on either the small coupler or larger coupler".

I decided a more comprehensive approach might be needed and photographic evidence was obtained...


I then sent another email to ****** telling them of my issues and included the pictures as proof that I knew of which I spoke.

Stephanie,

I\m sorry it's taken me so long to respond... I am still having issues with a few of the tips in the set that fit neither the standard coupler nor the large one.

The tips are 108, 109, 124, 143 - there may be more; I stopped checking (and I'm presuming there would be more of the ****** tips that I don't own that would have this problem).

I've attached pictures of what I'm talking about but if you can't view attachments, please let me know and I'll try to host them online and send links.
[The above pictures had been inserted here]

All of the four tips have the same problem... Their bottom diameter is too large for the standard coupler (the ring won't go down over the tip and attach to the base) and too small for the large coupler (the tip only rests on the coupler and the ring slides on right past it and attaches to the base leaving the tip completely not secured to the coupler).

None of the four tips are bent - I haven't used them because of this problem - so they're all new and perfectly round.

I eagerly look forward to your advice on this matter.

Kind regards,
Tanya
Mrs B bakes
I got this reply:
Hello there Tanya!

Thank you for getting back to us with this information. In regards to your questions I have some help for you. Tip 108, 109, and Tip 134 do not work with couplers. They are to be used with parchment paper or uncut bags. Tip 124 fits with the large coupler. We do not have a tip 143 but we have a tip 134 and again it fits with no coupler, just the paper or bag. I hope this helps and we appreciate your business!

Have a great day!

Sincerely,

Jenn
Customer Service Representativ
e
OK, so let me get this straight... When I emailed the first time and Stephanie replied to tell me that "All of our tips should fit on either the small coupler or larger coupler. " apparently, I shouldn't have taken this at face value. *insert Not Amused face here*

I'd like to end this post on a less annoyed note and share with you what happens when I decide to make "DIY Cupcakes" for a Christmas celebration of about 16 people...


That's the "ash" of the Powdered Sugar Volcano that erupted in my kitchen. (I went through about 4.5kilos of powdered sugar in making the TEN (all Vegan) batches of frosting for the 89 cupcakes! (One Almond Buttercream, coloured red. One Mint Buttercream, coloured pale green. Double batch of each Vanilla and Chocolate Buttercreams. Quadruple batch of the Cream Cheese frosting.) I say it was "ten" batches of frosting but I actually made four more that I tossed out and replaced as I became convinced that the cream cheese had been open and in the fridge too long to be 100% trustworthy. That's a LOT of sugar.

Why 89 and not 90 cupcakes, you ask? I have, honestly, no idea! I made four batches each of the chocolate and vanilla cupcakes (from ...Cupcakes Take Over the World ) which should have equalled 72 cupcakes. I think the batter grew/ multiplied/ spored/ spread/ reproduced/ something in order to create an extra 17 cupcakes. They did not go to waste, however, and I was rewarded with many a smiling face and even a marriage proposal! DIY Cupcakes are something I'd definitely do again! It was much less daunting than baking and decorating and transporting those cupcakes.

If you were hosting/revelling at a DIY Cupcake party; which flavours would you like?

Thursday, 18 November 2010

Introducing "Mud" - a vegan chocolate dessert


Mud, mud, I love mud.
I'm absolutely, positively, wild about mud!
I can't go around it, I've gotta go through it.
Beautiful, fabulous, super-duper mud!


If you're not familiar with the above little ditty you've probably never been camping nor were a member of a "scouting" organisation as a child. The song has been sung around many a campground fire and repeated with glee after numerous strong rainstorms.

I love mud. I love what can be done with mud... facial masks, pore cleansing, house building, children entertaining. Take some earth, simply add some water and it's amazing what you can accomplish with the resulting product.

Did you ever make MudPies as a child? Dirt in a pail, water added and served to loving, patient family members willing to pretend it's the yummiest dish they've ever consumed - what could be better?

How about serving them "mud" they'll actually want to eat?


Introducing "Mud" - a vegan chocolate dessert (free recipe!) from Mrs B bakes! It's a rich, velvety, sweet dish that's nothing like a mousse (no air), thicker than a custard or pudding and absolutely delicious!


Mud

1 (12.3 ounce/349 grams) package extra-firm silken tofu (I used an aseptic pack of long-life tofu called Blue Dragon) drained of excess liquid
1/4 plan milk replacement (I used oat milk but soya, almond, rice... would all work)
1 tbsp Simple Sugar Syrup (recipe follows) or 2 tbsp agave nectar or maple syrup
1 tsp vanilla extract
300 grams (about a cup and a half) semisweet chocolate chips

Break up tofu into a food processor. Add the milk, sweetening syrup and vanilla. Puree until completely smooth.

Bring a small saucepan half-filled with water to a boil and reduce heat to low. Place a metal bowl over the saucepan while it's simmering (not a rolling boil). Put chocolate chips in warming bowl and stir with a spatula while it melts. Once completely melted (no solid chips left) remove from heat (don't forget to turn off burner).

Scrape down the sides of your food processor, replace lid and turn on. Using the feeder tube, pour melted chocolate into the running food processor and blend until fully incorporated.

Using your spatula, transfer the mud into a bowl (or an airtight container) and cover with plastic wrap (see photos for a handy tip!) and chill. Mud is ready to eat after just an hour!

(Caution: Mud is not a pudding; it's much richer. Please keep that in mind when serving Mud as too much could overwhelm the palate.)


Instead of placing the plastic wrap over the rim of the bowl/container - lay it flat directly on top of the mud, creating an airless space between the mud and the plastic.

Push the plastic wrap to the outer edges of the mud and smooth to ensure no air is trapped between the mud and the plastic.

Curl/fold edges on top of centre inside the bowl, again to ensure no air contacts your mud.
These simple steps can help keep your puddings, custards and muds from getting a strange film across the top or simply drying out!

Simple Sugar Syrup

1 cup white sugar
1 cup water

Bring both to a boil in a saucepan (you may need to stir a bit to ensure sugar is completely dissolved) then remove from heat and allow to cool.

Store in refrigerator.

That's it! It's that simple (hence the name) and can be used to sweeten any number of things. Works especially well in cold beverages such as iced lattes, iced teas... it dissolves a lot faster/more easily than solid sugar granules so now that you've discovered it I'm sure you'll turn to it again and again!

Prepping for our photo shoot...

Friday, 22 October 2010

YES soup for you!

Being unable to eat milk products has left me with a wanting for certain foods such as pizza, mac'n'cheese, cream of tomato soup with grilled cheese sandwiches...

Thankfully, the list is small and I've stopped craving cheese so I'm able to find easy substitutes for these comforting foods.

Pizza is easy for me; I just use a yeast-free base and don't add cheese to my toppings. Problem solved.

Mac'n'cheese used to be an issue when I really wanted cheese but now it's OK. I sort of miss it but not enough to even take a bite of someone else's.

When it came to cream of tomato soup with grilled cheese sandwiches I was really stuck. I can't have the cream in the cream of tomato soup; can't have the cheese in the grilled cheese sandwich and even finding the right bread for me can be tricky. Nightmare.

That is until last week when I decided to just wing it. Thankfully, for the first time I started writing down what I was throwing into the pot instead of guessing afterwards. This also allowed me to take accurate measurements so, if the experiment worked; I could share it with confidence that what I told you wouldn't result in something horrid!

Well, it definitely worked. It worked so well I decided that night was officially Date Night and (pardon the pun) made a real meal out of it!

Thick and Creamy Tomato Soup

In a large pot add the following:

1/4c Extra Virgin Olive Oil
3 400g (14.5 oz) cans of chopped tomatoes (please approximate if your can size is different)
1 cup chopped spinach (mine was frozen)
2 bags of Steam-Fresh type mixed vegetables (I used Broccoli, Sweetcorn and Carrots by Birds Eye)
1tsp mix dried Italian herbs
1tsp Oregano
1/2tsp onion powder
1tbsp minced garlic (I use Very Lazy Garlic)
1.5L (about 6.5 cups) vegetable stock
Set aside 1 - 1.5 cups soya cream (I used reduced fat to great effect)

Bring this all to a boil allow to do so for about 10 minutes. Reduce to low heat and leave to simmer for about an hour (I left mine for about two hours and simply added some more stock later to thin it a bit but I like heavy soups).

Use food processor to blend the soup (make sure not to over-fill the food processor, this may mean you have to do two batches) and return it to the pot over low heat.


Just prior to serving add soya cream and stir to blend well.

I served this with garlic bread and it was a hearty meal that I intend to make a lot this winter. YUM!


Our backyard/garden/behind-the-flat/house-area is coming along nicely, the ground work is all completed and all that's left is to finish the decking!


I've been baking a bit lately:

Basic Chocolate Cupcakes with Chocolate Mousse topping


Almond Cupcakes with Vegan Cream Cheese frosting...


...and a surprise Chocolate Mousse filling


(Why do I feel the need to add the word "Vegan" when I say "cream cheese" considering the entire dessert is Vegan? I only bake Vegan but I worry that people will see "Cream Cheese" and get the wrong idea, I guess, so it's a little added emphasis that it's still OK even though it's called "cheese". I worry, though, that stressing the Vegan bit only there will lead to people to think that that's the only part that is Vegan. Oh, well. Can't please them all, as they say!)

See you soon!

Friday, 15 October 2010

Laundry "spiders", cookies and other life detours...

When I started this blog it was with the intention of showing you, dear readers, what it is that I love to do and how that love affects my daily choices, especially regarding my eating habits.

What I love to do is bake. I love to bake vegan sweet goodies that people are surprised about and utterly melt over.

This blog isn't very old and yet I already have a plethora of tags that aren't at all related to baking. This, for me, is a bit annoying but completely not surprising. I've always had many "layers" in my life and having begun to share more of them here seems, now, like a natural progression.

I'm sorry if you came here wanting only vegan goodies (sweet or savoury) and aren't that entertained by the rest of me. I wish you well on your own personal journey but this is a journey that I must make and, therefore, am taking the wheel and consciously deciding that it shall be reflected in this blog. All the layers. All the Me-s I have to offer.

If you don't mind and/or enjoy seeing more of my layers; welcome! We're in for a strange and wondrous trip, indeed!

Since it's been so long since I last posted I have a few things I'd like to share today so stay tuned or tune out. Either way I've numbered them so you can skip topics (or refer back to them) as you like....

1. Laundry "Spiders"

I have long hair. Very long hair by some standards, though it's not yet as long as I'd like it (and yet, simultaneously, I wish I could sport a chic, shorter style that better befits my physical age but alas, the build of my body makes longer hair aesthetically necessary *sigh*).

Because I have long hair I end up with it everywhere. On the floors, in the shower drain, on MrB's back as he's leaving for work, worked into a knitting or crochet project. That part's a nuisance, certainly, but OK as they're in small numbers and easily contained and removed.

What utterly annoys me, however, is the little balls of hair that I find in the laundry. Every. Single. Time.

I call them Laundry Spiders and toss away several of them every time I do a wash. (The record for one load is 7. SEVEN! from one load of mostly socks.)

Am I the only one who gets these?? Surely I can't be!

What do you call them?

Do you have any hints, tips, tricks for getting rid of them? I'd LOVE to know!

2. Baking

And now for something you may or may not have been waiting for. My original Chocolate Chip Cookie recipe.

///
Vegan Chocolate Chip Cookies

1cup dairy-free margarine, at room temp
1 1/4 cups sugar
1 tablespoon plus 1 teaspoon molasses
2 teaspoons vanilla extract (when I mix it up a little I use 1 teaspoon vanilla and one teaspoon almond)
2 1/2 cups all-purpose/plain flour
1 teaspoon baking soda
1 teaspoon salt
2 cups semi-sweet chocolate chips (or vegan carob chips)
3/4cup vanilla soy yogurt

Preheat oven to 350 F

Cream the margarine and sugar with a hand mixer until fluffy

Add the molasses and vanilla and incorporate. Add the dry ingredients to this mixture and mix until a dough forms. Fold the chocolate chips into the dough.

Drop by tablespoons onto ungreased cookie sheets or an ungreased, unlined cupcake tin. Bake for 8 to 10 minutes (my oven is -definitely- 8 minutes) until lightly browned. (Two notes: Due to their vegan status and chemistry, the cookies will not spread as much as normal cookies but that's good! Also, Don't worry about under cooking them as there's no raw eggs to worry about, though, the 8-10 minute rule, for me, leaves a cookie that's gently soft-crunchy on the outside and wonderfully soft and gooey on the inside!)

Allow to cool on baking sheets for 5 minutes then transfer to cooling rack. (At this point baking sheets can be rinsed under cold water to prepare them for the next batch.)
///

I know there are a ton of other good, vegan chocolate chip cookie recipes out there and respect that they are probably very good. I only decided to invent my own recipe when I realised that most of the better recipes which yield a softer cookie contain flaxseeds/linseed and I know a lot of people have seed allergies so wanted to avoid them if I could.

If/when you make these, please do let me know what you thought of the recipe. I live for feedback and won't necessarily know I need to change something unless you tell me. Yes, you.

3. Life

Just recently (last Thursday, to be exact) I went to see a psychiatrist who has diagnosed me with Adult (Inattentive) Attention Deficit Disorder and my life has been quite strange since that moment.

I went to him thinking I had it or something akin to it (Would it really be me if I had gone to a doctor without investigating the jeepers out of something first?! I thought not.) but when he confirmed that I do, indeed, have it I can't accurately describe what I was thinking or feeling.

There was some relief, some disbelief, some shame, some anger, some fear, some impatience... gosh, the list is virtually endless.

At the suggestion of a dear friend I purchased some books by Edward M. Hallowell (Driven to Distraction and Driven from Distraction - both can be purchased from Amazon.com/.co.uk) and from what I've read so far I truly believe my life will change for the better with this diagnosis. I'm almost through the first book and it's almost as though this book was written specifically for me. Mr. Hallowell certainly seems to understand the condition (as he well should, he suffers, too).

I'm sure there will be a lot more written on this blog about ADD in the future so I'm going to stop here now that I've introduced it.

4. AOB

Stay tuned because in the next few days I'll be introducing a Tomato "Soup" recipe!

Monday, 4 October 2010

Those poor, neglected cupcakes!

Mr Landscaper has taken a week "off" (he's working on someone else's garden that was booked before we hired him) and so I spent last week "cleaning".

"Cleaning" consisted of taking everything out, sorting through it, tossing what should be tossed, shredded what should be shredded, donated what should be donated and finally (and most importantly!) organised what was left!

It took me more time than I care to admit but it was fun! I thoroughly enjoyed the work that went into getting everything sorted, streamlined, easier to find/use/clean. I have a deep feeling of satisfaction from having everything in its place and a place for everything. I am, however, more than a little embarrassed at having let things get in such a state that it took so long to pull them back together in some sense of non-chaos.

During this past week I've also done some cooking and baking.

The first thing I baked was Green Tea Cupcakes from Vegan Cupcakes Take Over The World - I've since discovered that simply baking them isn't enough. While I was so busy cleaning I left the poor things sitting for a week. No love, no icing, no photo shoot, not even a bite taken to test how they tasted. The poor things just went to waste. I feel so horrid. They were lovingly created and then quickly forgotten. Left to sit in a bag, unable to live to their fullest potential. Their lives unfulfilled. Their destiny the trashcan instead of satisfying some lonely tastebuds some where. Poor things. I'll have to make them again. Soon. And this time actually pay attention to them!

I've also made some delicious Veggie Burgers from a recipe created by this talented lady. With her permission, I'm now going to share the recipe for these little beauties with you.

///

Smoky Tofu and Red Bean Burgers

(makes 6 patties)

1 14oz. can red kidney beans, drained and rinsed 7 oz. firm tofu, squeezed of excess water and crumbled 1 carrot, grated 1/2 onion, chopped finely 2 cloves garlic, minced handful of parsley, chopped 1/2 cup whole grain vegan breadcrumbs (I use a little more to hold the patty together) 2 T flour 1/4 tsp liquid smoke 1 tsp soy sauce 1 tsp all purpose seasoning (like Mrs. Dash or Trader Joe’s 21 Seasoning Salute) 1/2 tsp each of garlic and onion powder (you may add less if you like) 1/2 tsp paprika salt and pepper to taste

Mash beans in a bowl and add the crumbled tofu. Add the rest of the ingredients and stir to combine. I like to use a blender/masher or fork to help chop and smoosh the mixture which will make it form into patties easier. You may have a taste in order to adjust seasonings.

Refrigerate mixture in the fridge for about 30 minutes. Shape into patties and place on oiled baking sheet. Bake for 25-30 minutes, flipping halfway at 400 degrees F or until browned and crispy. (I actually fry mine in olive oil), Serve on a bun w/ caramelized onions, lettuce, tomato, sprouts and sauce below:

Thousand Island Burger Sauce With A Kick

1/2 cup vegan mayo 2-3 T ketchup 1 T chopped dill pickle or relish a squirt of lemon juice 1/4 tsp all purpose seasoning blend salt and pepper to taste 5-6 drops of hot sauce

Combine all ingredients and chill. Is great on the tofu burger and with seasoned fries.

///
I made mine a little differently. I placed my ingredients in my food processor and sort of pureed them. This meant I had to add more dry ingredients so I increased the flour by 1/4 cup and the breadcrumbs by 1 cup.

I really loved the way these tasted and can totally see them as "meatballs" in a pasta recipe! I will definitely make these again. And soon!


Now, for those of you wondering how I can have breadcrumbs since I can't have yeast I'll let you in on a little secret; I cheat.

Every once in a while (less often than I like, to be honest) I get to a Whole Foods and buy their sourdough bread. (It's amazing and light and not the least bit sour. I don't understand how this is but I don't argue!) When I slice it I don't like the ends as they're too thick for sandwiches or the toaster. Because of this I specifically leave the ends extra thick and throw them in the freezer. Then, I forget about them until I throw more into the freezer. Then I forget about them again and again until, eventually, I need breadcrumbs and I lament about not being able to have yeast. This happens for about 20 minutes before it finally dawns on me that I actually have yeast-free bread that I can use to make my own breadcrumbs! Yeah, sometimes I can be pretty slow. Don't ask. We don't like to talk about it.

I take the bread ends out of the freezer, let them defrost and then stick them into my food processor. (I find it's a lot easier to cut the thawed bread into golf-ball-sized pieces and use the "pulse" button on my machine. It cuts down a lot of the frustration and it makes the whole process take a lot less time.)


I then bag them in one cup portions (most recipes seem to call for this amount, why is that?), label the bags and store them in the freezer.


So, this week the landscaper is back (mid-week) and I can't wait. The closer we get to the finished product the more antsy I get to see it, use it, adore it.

I'm also getting a couple of little health nigglings sorted out in the next few weeks and working on my nutrition as I work on a vegetarian/vegan way of eating. (It's becoming more and more difficult as I'm having difficulties digesting beans without intense gas/wind and associated pain. Considering I'm allergic to lentils and don't want to over-do soy... I'm running out of ideas for proteins *frown*)

That's a savory recipe shared and the infamous vegan chocolate chip cookies recipe is on its way (hopefully this week) - so what would you like to see me make next?

Wednesday, 22 September 2010

Still plugging along...

I'm still at home babysitting the landscaper as he transforms our backyard/garden into a space we can not only use but are actually proud of. No small task, I can assure you... Before pics can be seen here.

Here are some pictures of the last few days of work...


Just this evening the paving stones were finished and pointed but there wasn't enough light left in the day to take a photo so I'm going to do another photo shoot this weekend. I can't wait! Next stage: Decking!

In other news; I'm working on some new projects that have sort of fallen into my lap and I'm excited about the prospects they bring. Here's a sneak peek...


Yes, those are old 45s! I found them next to our skip outside and rescued them from the landfill! They're badly treated and scratched. Totally unplayable but heck! I don't want to play them. I want to play with them!

I plan on transforming them from the shapes they are to some that are more form than function and some shapes that are both form and function!

(On a side note; whomever had these beauties as a similar taste in music to myself! It's all 80s/early 90s Pop... Right Said Fred, Spandau Ballet, The Human League, Prince, Paul McCartney to name but a few. And those are just the few with labels I could save! There's a ton of other ones just as impressive but, sadly, the labels didn't survive. (When I found them, they were so wet they were mouldy and stuck to their covers/each other. Ick.)

Look for them in my Etsy shop, soon! Hooray for Up-Cycling!

Also, I'm in the process of "finding" my sewing machine. It's not actually lost, it's more...hidden buried. It hasn't seen the light of day since I made my wedding dress a while back...


It will be nice to use it again. And boy, will I use it! To continue with the above theme of up-cycling and in the vein of organising my craft space/office/Geek Room I'm getting together all of the no-longer-wearable clothing I've accumulated over the last few years and will be making some cute bags from old jeans, saving them from the landfill, too! I can hardly wait but it is getting tricky trying to find enough hours in the day and days in the week to accomplish all that's spinning around in my little brain. At the moment I have lists. Lots and lots of lists!

One of the main things on that list is "What to bake next?!" I'm thinking I'll bake a vegan cornbread (largely because I know it will go well with the vegan Boston/New England Baked Beans). Do you have any suggestions of dishes you'd like to see me make (or attempt) to make vegan? I'd love to hear your ideas!

And then there's these yummies...


That's right! The now all-but-famous Mrs B bakes totally Vegan Chocolate Chip Cookies! The recipe has been perfected, tested and approved and will be shared with you darlings very soon so "stay tuned" for that!

Thursday, 9 September 2010

Added to the list of baddies...

As you probably know I am allergic/intolerant/sensitive to a plethora of foods which makes an "alternative" diet a bit tricky. IN an effort to streamline my life and make final decisions about what I can and cannot, will and will not eat; I dragged myself back to the allergy specialist for more testing on some foods I've been avoiding largely based on fear, cloudy childhood memories and a lack of willingness to test some of these foods and "fail" by having a potentially severe reaction.

I bought 7 tonnes of food, most of it dried, and brought the specialist The Sadist little sample bits of my fears.

After pricking my arms twelve times it was diagnosed that I am, indeed, severely allergic to some of the foods I was scared about. These are the culprits...

"Puy Style" Dark Speckled Green Lentils
Red Split Lentils
Brown Lentils
Green Lentils

Shall we just say .... all lentils? Grr, so frustrating.

On the other hand, we've learned that I'm -not- allergic to chickpeas, pine nuts, flax seeds, mung beans, aduki beans or millet!

(Sorry for the mush but the dried foods weren't conducive for testing as we couldn't guarantee that any of the allergen entered my skin. The mush ensured that it would.)

That's -fantastic- news but I must admit that some of those (along with the list of nuts OK'd at my last visit) I'm still afraid to eat because I've spent a lifetime avoiding them and thusly have almost brainwashed myself a bit. I -will- try them, I just need some time to convince myself that to do so will be OK ;)

**DISCLAIMER** I'd like to take a moment here to make this important PSA... Just because someone has a "negative" skin prick result (meaning that your skin isn't allergic to the allergen introduced) doesn't mean that you won't have something like OAS when you eat it. Consider yourselves warned/reminded.

I've been a busy little beaver doing all sorts of "chores" today... laundry, dishes, cooking two meals, assembling


and baking cookies!


///
Vegan Zucchini/Courgette Cookies
Stir together in a bowl:
1 cup brown sugar
1 cup grated zucchini/courgette (I think I'll add a bit more next time)
1/2 cup canola/rapeseed oil
1 teaspoon vanilla

Sift together in another sized bowl:
2 cups flour
1 teaspoon baking powder
1 teaspoon baking soda
1/2 teaspoon salt
1 teaspoon ground cinnamon
1/2 teaspoon ground ginger
(Optional:
3/4 cup toasted, chopped pecans or walnuts
1 cup raisins)

Preheat the oven to 350 F (150 C). Add the wet mixture to the dry ingredients and stir until combined. (Stir in the nuts and raisins.)

Drop spoonfuls of dough on parchment-/baking paper- lined baking sheets. Bake for 12 minutes. Remove cookies and place on wire rack to cool.

Mine, pictured above, probably look a little darker than you'd prefer in a cookie. That's because I actually set my oven hotter (by about 50 degrees C) than I should. They still taste good (they're not burned) but I will make sure I check the required temperature versus the actual temperature of my oven next time!
///

After my adventures today I've declared the rest of the evening for knitting *grin*

Sunday, 29 August 2010

Beans, beans, the magical fruit*...

Cooking is one of the skills I possess that I actually have some confidence in. So, when I utterly messed up making Boston Baked Beans the first time I was at once angry, embarrassed and annoyed. I knew I must make amends. Here's the long anticipated "Boston Baked Beans, the Redux". (OK, I'm probably the only one who's anticipated this for a long time but let's face it: the first run was such a stunning disaster that I've been itching to redeem myself in the baked bean world.)

I now proudly present to you.... Home-made vegan Boston/New England style Baked Beans!


Don't they look a LOT better than the previous attempt?!


I think so, too! And I can honestly tell you that the first attempt was utterly inedible so to say that these little beauties taste "better" is, quite honestly, a severe understatement.

These beans are just the right amount of smoke flavour (without the bacon/pork), molasses and mustard to set my little New England heart a flutter. (Even MrB thinks they're good and he didn't grow up with these in his staple diet.)

Without further ado I present...

Vegan New England-style Baked Beans
Serves approximately 16 (portions can be frozen. I halved the recipe for my use)

2 pounds white beans (northern or navy beans - I used Haricot)
2 teaspoons salt
2 teaspoons dry mustard or 5 teaspoons prepared mustard (I used 1 tablespoon of yellow "American" mustard)
1/2 cup molasses
1/2 cup brown sugar (optional, if you like your beans sweet)
1 onion, peeled and chopped
2 tablespoons olive oil
1 to 2 teaspoons liquid smoke
For both preparation methods:
Soak the beans overnight in plenty of tap water (make sure you soak in at least four times more water by volume than beans). If you don't have the time or patience to soak your beans overnight you can bring the beans to a boil on the stove, cover and allow to sit for about two hours. This will reduce the cooking time significantly but it is still a crucial part of the preparation.

If you opted to soak your beans you must now boil your beans for about 30 to 45 minutes.

Drain off any soaking/cooking water.

Crock-pot method: Mix all ingredients in your crock-pot and add the beans. Cover with at least enough
hot water to cover the beans completely. (This is what the recipe I used said to do so I didn't measure the water. I also then had to add more water later in the cooking process. If you do this, make sure you use freshly boiled water or else it will lower the cooking temperature of your crock-pot and add significantly to the overall cooking time. When I make these again, I will add enough water to cover the beans and so that the water level is half-again as high. Or I'll chicken out, add the amount at the beginning and just check about half way through the cooking like I did last time.)

Put the lid on the Crock Pot after you’ve mixed everything up in it, and cook it on High for about 3 or 4 hours, or on Low for 8 to 10 hours (when it comes to crock-pot cooking I'm all about Low and Slow). I positioned a folded dish towel on top of the lid of the crock-pot to help keep the heat in while the beans were cooking to ensure they would, indeed, cook. The dish towel helps maintain a temperature hot enough to just barely simmer the beans.)

If you don't want to cook your beans in a crock-pot you can use this method...

Oven method:
In a very large casserole (4 quart) mix the beans with all of the above ingredients. Add enough hot water to barely come to the top of the beans. Put a lid on the casserole, or tin foil. Bake the beans at 300°F (
150°C)
for about 5 to 7 hours.

The cooked beans may be frozen in 2-cup portions to substitute for canned baked beans or canned pork’n'beans in any recipe. They make a good main dish, or a side dish for a large crowd.


*If you grew up in North America, as I did, chances are you're aware of the little ditty that I borrowed today's post title from. If not; I'm sorry to have introduced you to such immaturity. In any event; feel free to remind me that I have the brain of a seven year old, though I must confess that I am well aware of this fact. *grin*

Wednesday, 25 August 2010

All in the name of science

Today was a day of itches.

Not the nice "ah, let me scratch that.. that's better" kind of itches. No. Today was a day of "For the love of -goose- that itches and I can't scratch it!" kind of itches.

Today, I went to The Sadist (professionally known as my Allergy Specialist) who loves nothing better than mixing a myriad of food and plant stuffs with some benign solution, pricking my arm repeatedly (no less than 22 times this visit, thank you!) then sending me out to the waiting room for a period of 15 to 30 minutes while I marinate, cry, itch, squirm, count the seconds until I can take an antihistamine. (For those who don't know what the Skin Prick allergy test consists of: stay tuned to the end of the post.)

Yesterday, I had headed to a "healthy" kind of grocery shop and stocked up on some foodstuffs I was concerned/curious about. Here are the dry ones...

Last night, MrB and I meticulously packed sample-size portions of each food so that I wouldn't have to lug all of those containers and their contents halfway across London on the Underground and here are the ones that were deemed "safe"*...

and the ones that we need to test some other day...

I called The Sadist's secretary yesterday to ask if I should soak the beans/legumes/pulses/lentils overnight or just cook them or leave them be or what but The Sadist wasn't available for contact so I was advised to just bring them as they were. It turns out that most of these babies are too tough in their solid state to guarantee any food actually penetrated my skin when it was broken meaning that any results aren't certain. (Mushy foods are much smaller molecularly and therefor easier to force under the skin.)

So, I need to make another appointment. *sigh* To be honest, though, the 20+ pricks I got today were tough enough that I'm glad I didn't have another ten itchy spots to contend with.

Things I learned today:
  1. I am severely allergic to goat's milk. (I know that I have a severe allergy to cow's milk but MrB and I were curious as to the possibility of other animal milks.) It turns out that if you have a severe cow's milk allergy the odds are that you will be allergic to the milk of other mammals. The Sadist asked if I'd like to be challenge tested for sheep's milk because my reaction wasn't as severe as the other milk reactions but warned me sternly that "under no circumstances" was I to encounter/test myself with an animal milk at home "or even sitting outside A&E [the ER]".
  2. I was wrong when, as a child, I had convinced myself that I was allergic to nuts. It turns out I am not. (The Sadist and I have agreed that what probably happened is that I had a bit of an OAS reaction to walnuts not quite knowing how it differs from a dangerous allergy. This is, interestingly, attached to my Birch allergy.) And, now that I'm not allergic to any of the nuts The Sadist tested for today (and also peanuts, cashews and almonds) I'm allowed to perform my own OAS investigations at home with nuts. (Basically, take a nut, rub it on my wetted bottom lip and wait 15 minutes to see if I react.)

Almost two years ago I "had a run in" with strawberries that meant I've been earnestly avoiding them since. It wasn't an allergic reaction or even OAS but it was weird and something I wanted to not repeat so strawberries were out. Because my body is so sensitive and changes so often I decided I'd get tested for them, too. Turns out (as I suspected) I'm not allergic to them so I am now sitting down with this...
(they really are as yummy as they look)

...to see how I fare tomorrow. If said weirdness returns tomorrow I will know that I cannot have strawberries and I will, of course, report my findings here to you. (This odd symptom isn't something "new" or unique to me but it is still relatively unknown because strawberries aren't usually consumed in huge amounts.)

So, how did you spend your afternoon?


(Skin prick allergy testing involves preparing myself up to a week in advance. Because I have eczema/psoriasis I have to stop using topical steroids on my hands/arms for about a week before I get tested because their presence can inhibit any reactions. I also have to stop using my antihistamines for at least 24 hours -I try to go 48ish to be sure- for the same reason. If The Sadist is testing me for an allergen he has in his handy little kit then it is a liquid placed in a small drop (it looks like water) on my skin through which he pierces my skin with a lancet-type device that doesn't just have one sharp point but four. And he turns it to make sure it definitely breaks the surface of the skin. A little annoying but I can handle that pretty well. If there's a substance/food that isn't in The Sadist's little bag o' tricks then I have to provide it. Liquid, soft or mushy foods are best as they are comprised of smaller molecules which means it's easier to get enough of the sample through the break in my skin that any reaction (or lack thereof) can be deemed as official. If the substance is solid/too hard/dense (as we found out today) then The Sadist can't guarantee that there was enough of it on the lancet-type thing when it penetrated the skin to ensure a real result (if I don't react was it because I'm not allergic or because there wasn't any/enough allergen introduced?). This is done until we run out of things we want to test/The Sadist gets bored. Then he pricks my skin with a lancet with -nothing- on it (known as the Negative Control = I shouldn't react at all) and a lancet that has pure histamine (known as the Positive Control = I should react and the size of that reaction can help him gauge the others). Then he sends me out of the room to stew. I try to occupy my hands with an electronic game (usually on my phone) so that I don't scratch/rub/scream. I've tried crocheting and knitting but sharp objects that are perfect for scratching aren't so good when you're trying desperately not to scratch. Plus, I fidget so much during that time that I'd be dropping stitches left, right and centre. Not a calm me would that make. When I'm called back into the room The Sadist reviews the sizes of my bumps (ooer!) and makes his diagnoses. Then we discuss if/where/when we need further testing and I am allowed (finally) to take an antihistamine to help calm my system down. Once that's done we shake hands and I head home. Not too horrible, really, I'm just a big baby when it comes to really itchy itches. *grin*)

Monday, 16 August 2010

A lesson in failure...

I want to let you all know that it's not always sunshine and roses in Mrs B's kitchen.

I don't always perform feats of culinary mastery. More often than not I'm flying by the seat of my pants/trousers and if there's a good result... Bonus! but sometimes (a lot of the time) there are mistakes, mis-read recipes, ovens left unattended or forgotten.

That kind of thing, admittedly, doesn't happen often. Most of the time the little fairies in my oven work wonderful magic and I pass it off as my own "hard work" after lots of praying "please work please work please work" and doing a little jig in front of the oven door.

I do make mistakes, though, and here's proof...

I read an idea on The Interwebs the other day that Bananas make really good vegan ice cream... if you freeze them whole, then put them straight into the food processor/blender, they contain just enough freeze and self-binding that that's all you need to do. Freeze, scramble, eat.

Simple enough, right? So, I froze some bananas....

And then I tried to peel them. But peeling them from frozen seemed rather tricky so I jumped back to The Interwebs and did a search for "peeling frozen bananas".... And it would seem that I'm an ass. Did you know that you should Peel. Them. First.!? Neither did I! So, all those brown, ugly, useless rocks were composted and I did this...

That seems so much more sane... with the benefit of hindsight. - I'll be making Banana Ice Cream soon (once I get over the self-humiliation of The Frozen Banana Peel Incident) and I'll let you know how what I thought of it when I do.

I decided, then, that it was time for a success in Mrs B's kitchen, so I did this...

I soaked some haricort beans so I could make some vegan Boston Baked Beans using this recipe.

This is what I got after 7 hours in the crock pot...

Nasty, no? See how they're all black/brown and there's almost no water/moisture? Not like Boston Baked Beans at all! So, why didn't the recipe tell me to add water?? What did I miss?? I went back to the recipe and scrutinised it...

When I made the recipe I read the ingredients and the bit about cooking them in the crockpot rather than the oven. This means I skipped the instructions that weren't relative (as far as I could see) to the method I planned to use. I read "Boil the soaked beans for 30 minutes, as directed above. Then, instead of combining everything in a casserole, combine them in the crock pot instead" which, to me, means that I add everything that's in the ingredient list, right?

No, as it happens. I'm a dumbass. There are instructions for both cooking methods in the first paragraph. How many times have I read a knitting pattern, a sewing pattern, a crochet pattern through All. The. Way. to make sure I understood everything?? Too many to count. There is supposed to be water added. Now I know.

And "knowing" is half the battle.

So, here I am, two failures under my belt in the same day. Argh.

What do I do? Do I admit defeat and call the day a wash? Start again tomorrow?

Hell no! I start again straight away, salvage some of my cook-esteem, redeem myself in the eyes of.... myself.

I made this little beauty...

Apple Tosca

And here's how... (non-Vegan advice can be found at the end of the post)

Preheat your oven to 200C (just under 400F)

While your oven is heating, slice 4 medium-sized apples and spread over a baking pan (for this amount, I find a pie plate is a sufficient size) and put in the oven so that the apples have a chance to cook and soften a little while you're preparing the top.

Now, in a saucepan over low heat, combine the following:

75 grams (1/3cup) milk-free margarine

75 ml (just under 1/3cup) sugar

2 tablespoons agave nectar (I used less because of the ice cream) you could also use maple syrup or corn syrup

2 tablespoons cream (I had oat cream but decided to use soy ice cream)

200 ml (just under 1cup) oats

75 ml (1/3cup) flour

1/4 tsp cinnamon (optional. I didn't add it this time)

When everything is melted and mixed well together: take the apples out of the oven. Pour (scoop) the oatmeal mixture over the apples and spread evenly.

Bake for 20 minutes.

It should look something like this (if you omit the cinnamon. If you use cinnamon it will look like this but speckly)...
Pretty, isn't it? It tastes even yummier than it looks!

Here's mine with soy custard...
And Mr B's with soy vanilla ice cream...

So, to come we have Boston Baked Beans, the Redux and Banana Ice Cream, also a Redux. Let's hope these incarnations go a little more smoothly! I don't think my cook-esteem could take another blow this week! *grins*

Apple Tosca comes from a family favourite that's totally not vegan so feel free to use normal margarine, cream (or ice cream) and honey as to your heart's content. My family loves each version equally as *whispers* they can't tell the difference! ;)